Showing posts with label crafts. Show all posts
Showing posts with label crafts. Show all posts
Thursday, January 17, 2013
Animal faces

Tuesday, February 28, 2012
What are these two making now!?!?
I LOVE my boys but they can do some things sometimes that makes me stop and say "what are these two making now???" I thought you might like to play along this time.
 They need safety googles if that helps, probably not though.


Here is some of the supplies that they used. Lots of wood and some files, drill, and a saw.

 They spent time sawing at the wood (Dad was always right next to them for safety)

 Sam even got to use the power drill, only with his dads help though. (mostly so mom did not have a heart attack)
 Finishing up at the end. Filing and screwing.
 Oh there is an elastic, any guesses yet. No?
 Sam assembling the end of his.
 Surprise they built their very own catapults! They love them so much. After all you need a good sturdy catapult when you want to attack a castle.


Here is some of the supplies that they used. Lots of wood and some files, drill, and a saw.


Don't you think it is huge, that is our car next to the wheel. LOL These were actually kits that we got at Wal-mart. It is from the company Red tool box. They have lots of other projects on their site if you want to check it out.
Thursday, February 23, 2012
Some Simple School Project Tutorials.....
Ok so as homeschoolers we are always on the look out for new fun ideas to learn with, who of us is not looking. The boys do the worksheets but they always want to do some active fun things. (really who can blame them) So I thought that I would share a couple of ideas with you that I put together recently for them and show you how easy they were to make if you want to make some too.
The first idea is something that I made for both of the boys. Landmark blocks, I first saw the idea for it on pinterest and it linked me over here. I thought that it was such a wonderful idea that I had to do it. My boys love learning about the world, so much so I had to find away to make it challenging for them. Check it out to see how I made it a little more challenging...

First gather the size of blocks that you want it to be. These are just some old megablocks that are for ages one and up.
 Once you have done that find a picture that you want to use (This is the Australian Capital building, one of the ways that I made it more challenging. Sam knows alot of landmarks so I had to start using capital buildings) I just printed this picture from the internet. Once printed I used mod podge to glue it down. Then I put a layer over the top to seal it down.

 After the dried I cut them all apart. (They are actually 2 sided to give even more of a challenge).
 The problem that I have found with mod podge (which I love using very much) is that even after it dries it can still be sticky. An easy way to fix this is spray down your pieces with clear spray paint, problem solved.
 The finished blocks. They were very easy to make and the boys love them. Our only problem now is that we need more because the kids want some with art work and animals from around the world. We have already used them to do grammar. So many ideas, what will you make with them.
 To give Sam a little more challenge with them I made these cards. On the front side I wrote the country names.
 The back have the pictures and info about the location.
 I placed them out like this for him and he then assembled the buildings. Once assembled he put with what country he thought it went to. Once he finished he flipped them over to check if he was right or not.

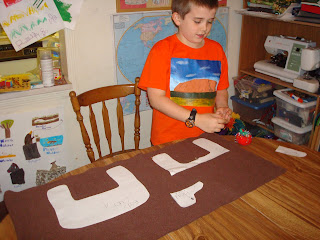
The next project I did was for Gabe. It was a lesson for him to work on word families. I have seen this idea all over the internet so I can not remeber where I originally found it sorry.
 I used a bunch of paint cards that I got from wal-mart awhile ago.
 I painted word families on each card.
 Then I made a chart with the alphabet and some common groups of Letters.

The first idea is something that I made for both of the boys. Landmark blocks, I first saw the idea for it on pinterest and it linked me over here. I thought that it was such a wonderful idea that I had to do it. My boys love learning about the world, so much so I had to find away to make it challenging for them. Check it out to see how I made it a little more challenging...

First gather the size of blocks that you want it to be. These are just some old megablocks that are for ages one and up.


The next project I did was for Gabe. It was a lesson for him to work on word families. I have seen this idea all over the internet so I can not remeber where I originally found it sorry.


He then takes and runs it along the to find different words.
See they are easy to make projects and they cost me absolutly nothing.
Thursday, October 13, 2011
Going Batty!!
I love reading the blog MADE. The other day I saw her tutorial for making these pillows. I thought that they were so cute and had to make them. I did not have any pillow forms to fill it with so I just used the throw pillows on the couch. I made the casing as an envelope so that I can just take them off when ever I want. I used bat fabric to make the actual bats on the pillow. The orange is fleece so the pillows are nice and soft. The kids love them and so do we. They were nice and easy to make. The part that my husband loved the most is that they were free (used supplies that I already had). When I do have a chance though I think that I am going to buy some new pillows to put inside them. The ones from the couch are getting to be a little flat.


Thursday, December 09, 2010
Just a little ..... Jet pack!!!!
I thought that I would share one of the new projects that I made for the boys. A really cool Jet Pack! What little boy does not want their own jet pack. I have to admit this is not completely my idea. While looking through the many amazing and wonderful craft blogs out there I came across this. My only dilemma is that she made it out of recyclables (Gabe would destroy that in a heart beat), So I designed it out of fabric so that it could last longer.
 I had problems attaching the two tubes together so I ended up hand stitching a panel in between. This worked out, because it fit him better and now fits Sam.
 To change it up a little I made wings for it too. They are completely removable in case he does not want to have them on. Which is a good thing because he does not like them on much, I think that I made them a little to small (oops!)

 He had so much fun blasting around the park.


So it turns out to be a great gift for the active kid in your life. It would make a great present under the tree don't you think?
Friday, November 05, 2010
Ted the Turkey....
O.k so I do not do much decorating for Thanksgiving. Basically all I have is some decorative pumpkins in the window. Well I wanted something for the door. I saw Ted here at Joanns one day (half off, woohoo, only 2.50) so he came home with us. He was unfinished so I painted him up. Then I put a coat of outdoor Mod Podge on him incase of rain, I did not want him to wash off.


I think that he came out really cute. I love the how bold the colors on his tail look.
Wednesday, July 21, 2010
Marsupial Love
Looky, Looky I made it back for a second day straight. Woo Hoo! Alright I will get to why I am here, I thought that I would try to get everyone caught up on what we have been doing and the boys have been loving of it. To start off with the boys are loving studying Australia, so much so they want to move there. :0)
 The thing that they are loving the most are the animals, mostly the marsupials. This picture is actually of a poster that the made recently about the different marsupials. It has the fur pouches to store each animal in. They included on the back of each animal some info about it. Then to top it off the drew what each of the habitats looked like. They are pretty proud of how it turned out, I think that they did a great job.
 I shared photos with you yesterday of the platypus that I made for the boys, I thought you might appreciate these. Gabe is having so much fun with his, he made a leash all on his own for it. As you can see he is pretty pleased with himself. The photo below is just to give you a closer look at what he did.

 My other one ever so eager to learn, has decided to design his own stuffed animal now. He is making a wombat. Of course he is going to end up making two because his little brother wants one too. I am very proud of the ambition that he has.
 On a side not if you look at his shirt that he is wearing it is another sign of how much he is loving Australia. It is a shirt that his dad painted for him of Ayer's rock.
 This final picture is not of an animal (well if you ask him he will tell you that he is a monkey, LOL) but of Gabe's sewing project, Australian themed. He is making a boomerang pillow.
 The thing that they are loving the most are the animals, mostly the marsupials. This picture is actually of a poster that the made recently about the different marsupials. It has the fur pouches to store each animal in. They included on the back of each animal some info about it. Then to top it off the drew what each of the habitats looked like. They are pretty proud of how it turned out, I think that they did a great job.
 I shared photos with you yesterday of the platypus that I made for the boys, I thought you might appreciate these. Gabe is having so much fun with his, he made a leash all on his own for it. As you can see he is pretty pleased with himself. The photo below is just to give you a closer look at what he did.
 My other one ever so eager to learn, has decided to design his own stuffed animal now. He is making a wombat. Of course he is going to end up making two because his little brother wants one too. I am very proud of the ambition that he has.
  On a side not if you look at his shirt that he is wearing it is another sign of how much he is loving Australia. It is a shirt that his dad painted for him of Ayer's rock.
 This final picture is not of an animal (well if you ask him he will tell you that he is a monkey, LOL) but of Gabe's sewing project, Australian themed. He is making a boomerang pillow.
I will make sure to share photos of each of their projects when they are done. Until then I hope to be back soon, Have a great one everybody.
Tuesday, July 20, 2010
Pepto and Perry
Yup we went missing again.. Did you miss us? Goodness life sure does get busy. I have been wanting to get back to blogging so much. I really do miss it. Thought that I would share something I made from the boys yesterday. One of the things that has changed around here is that we are now studying Australia, and the boys are loving it! So I thought that I would make an attempt at designing and making my very own stuffed animals, I made a platypus for each of them.
 Meet Perry and Pepto. I think that they came out pretty good if I do say so myself. I do have some changes that I would do making them again. The biggest thing that I would change is the legs. They ended up being a lot more narrow then I would have liked, oh well can not be perfect on the first try.

 Gabe and Pepto
 Sam and Perry (yeah he is a Phineas and Ferb fan)
 They even tried building a platypus den to play in. Lots of fun going on with them already.
 Meet Perry and Pepto. I think that they came out pretty good if I do say so myself. I do have some changes that I would do making them again. The biggest thing that I would change is the legs. They ended up being a lot more narrow then I would have liked, oh well can not be perfect on the first try.
 Gabe and Pepto
 Sam and Perry (yeah he is a Phineas and Ferb fan)
 They even tried building a platypus den to play in. Lots of fun going on with them already.
 Well I would love to say that I am going to be back with a new entry tomorrow, but who knows. I have some ideas on where I can squeeze some time in for it, hopefully that works. So thanks to everyone that has stuck with me on this hiatus. Hope I will be back on a regular basis now. Until next time I hope everyone has a good one.
Friday, March 12, 2010
Spelling Dice Tutorial.....
I have wanted to try making a tutorial for awhile. I thought that I would try a an easy one to start off with. When ever the boys do spelling I try to through a game in every other week to break up the worksheets. This week they are going to play with the Spelling Dice.
 SPELLING DICE...how to
 I started off getting together my supplies. I got a package of wooden blocks, about 1 inch square. Paint of choice for the blocks. Then some letter stickers. Also mod podge for the finish.
 I started of by painting the blocks (Gabe picked out the color). Once that was done drying I put the stickers on it. (oh yeah love the elmo in the background. It is one of the old place mats of the kids. They no longer use them for eating but it makes great area for painting)
 Ok, sorry this picture is so blurry. This is the final stage, apply the mod podge. I had to apply several coats of it to get it smooth. I think that was because the brush I used. I am making story dice for Sam and I switched to one of the little foam brushes. It is going on so much easier. Also be aware if you use the mod podge that it takes awhile for it to dry.
 Then I finished off the whole project with making this litte bag to store it in. It was a really easy project to make and really cheap to. That is always nice. So what are you waiting for, go ahead and make yourself some.
Subscribe to:
Posts (Atom)